Posts tagged "Workflow"
-
Agent Runners are now better at completing their work when a run has less credits remaining than the task requires.
If you are close to running our of credits during a run, the agent will start focusing on delivering the most useful result it can with the credits it has left. It finishes work already in progress, leaves the project in a working state, and provides a clear summary of what it completed.
Previously, an ambitious task could end abruptly before the agent wrapped up, leaving partial changes and little explanation. Now, you’re more likely to get a working result you can use right away, or a solid, clearly documented starting point for your next run.
This improvement applies automatically to every agent and model available in Agent Runners. There’s nothing to enable or configure. Learn more in Make changes with Agent Runners and how credits work.
-
Sharing your Netlify projects is now faster with built-in social media share buttons.
When you’re ready to show off what you’ve built, you can share your project directly to X, LinkedIn, Reddit, Facebook, or Bluesky. Choose your preferred platform and Netlify opens a ready-to-publish post with your project link, so you can reach your community with fewer steps.
-
You can now connect repositories hosted on Cursor Origin to Netlify, so every Git push deploys an updated version of your project at a preview URL or a production URL.
Netlify supports Cursor Origin with continuous deployment, meaning that once your codebase’s repo is connected, Netlify will automatically:
- Build and deploy your project with every git push
- Build Deploy Previews for your pull requests
- Send deploy notifications to your pull request comments on Cursor Origin so you can check preview URLs there
Requirements
Cursor Origin uses OAuth authentication, so connecting a repo works much like our existing Azure DevOps support: the Cursor user who authenticates needs access to the Cursor Origin codebase that owns the repository.
To use Cursor Origin with Netlify, you do not need a specific pricing plan with Netlify.
Support scope
Note that features outside of continuous deployment, such as Agent Runners and the Netlify Drawer, are not supported at this time.
Get started
To learn more, check out these docs:
-
Agent Runners can now scope ambitious prompts for new projects to create a partial working project and provide next steps within the available credit budget.
Previously, a brand new project could use up its credit budget before the agent finished for ambitious prompts, leaving the run marked Cancelled partway through.
Now, your agent scopes the work more intelligently. It builds out part of the project and shares a plan for next steps, so you can preview a working version within your new project credit budget instead of the run stalling out.
Learn more in Make changes with Agent Runners.
-
Netlify now creates a Deploy Preview for every pull request in a GitHub stack when the stack ultimately targets your project’s production branch (usually
main). You can review and share each layer of a larger change before it merges.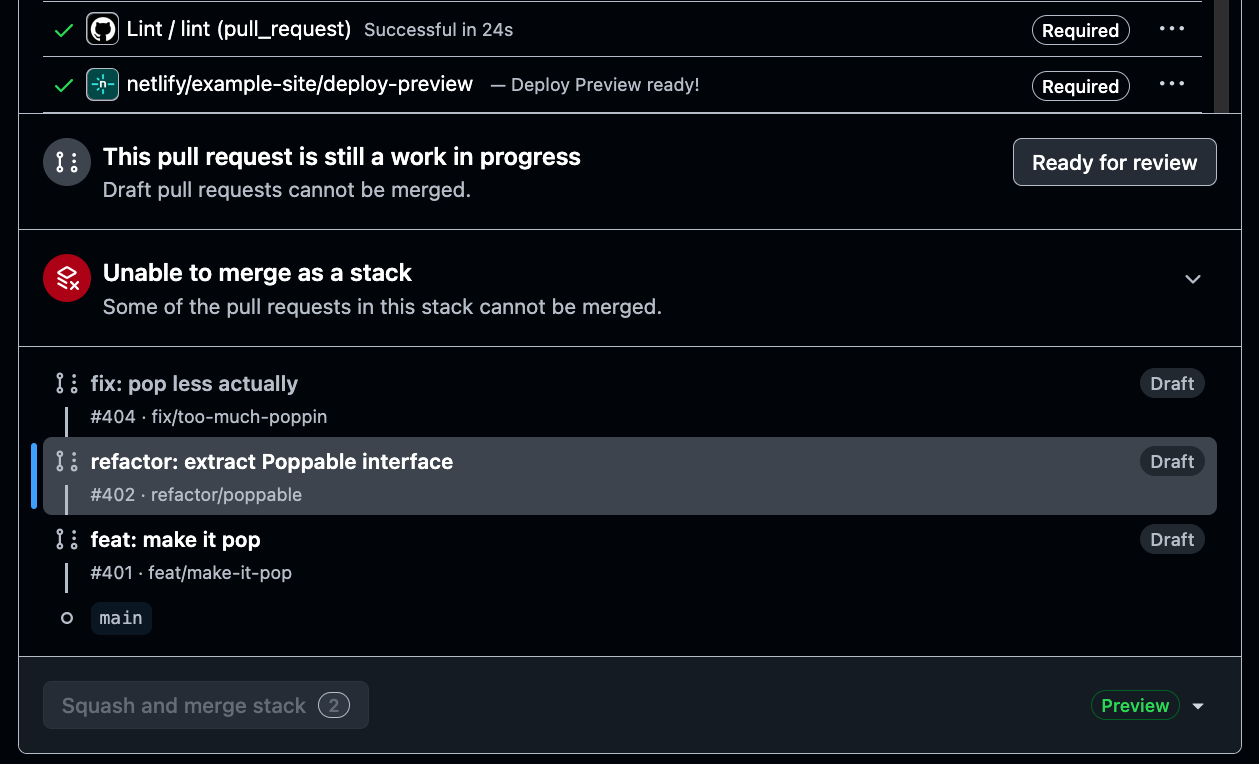
GitHub Stacked Pull Requests help teams split a larger update into smaller, connected pull requests. Each pull request can focus on one step of the work, making changes easier to review and merge in sequence.
Previously, Netlify only created a Deploy Preview for the first pull request in your stack while additional pull requests in the stack didn’t get their own Deploy Previews. Now, every pull request in the stack gets its own Deploy Preview.
There’s nothing new to configure. Create and update your stack in GitHub as usual, and Netlify automatically adds a Deploy Preview to each eligible pull request.
Learn More
-
Private projects on Netlify will now show a pre-launch toolbar so you can share your project for review and run audits using AI checks before you make your project public.
Private projects and agent runs require a Credit pricing plan. If you’re on a Legacy pricing plan, you will not have access to the pre-launch toolbar. Audits consume credits like any other agent run.
For public projects, new projects created on a Free plan on or after August 19, 2026 show a Powered by Netlify badge to all visitors.
The badge is configurable for each project through your project configuration settings.
To turn the Netlify badge on or off for all visitors of your site:
- Go to Project configuration > General > Powered by Netlify badge and turn it on or off.
Additionally, any visitor can hide the badge for themselves, and that choice is stored locally on their browser and never reaches Netlify.
All projects created before August 19, 2026 have the badge off by default.
Users on a Credit-based Personal and Pro plans can also turn the badge on or off per-project. For these plans, the badge is always off by default.
Release timeline
We’re rolling both overlays out gradually over the next few weeks, so a project that qualifies may not have them yet.
Learn more about the pre-launch toolbar and the Powered by Netlify badge in the Netlify documentation.
-
Agent Runners can now ask you clarifying questions before they start building. When a few details could significantly improve the result, the agent pauses and asks instead of guessing.
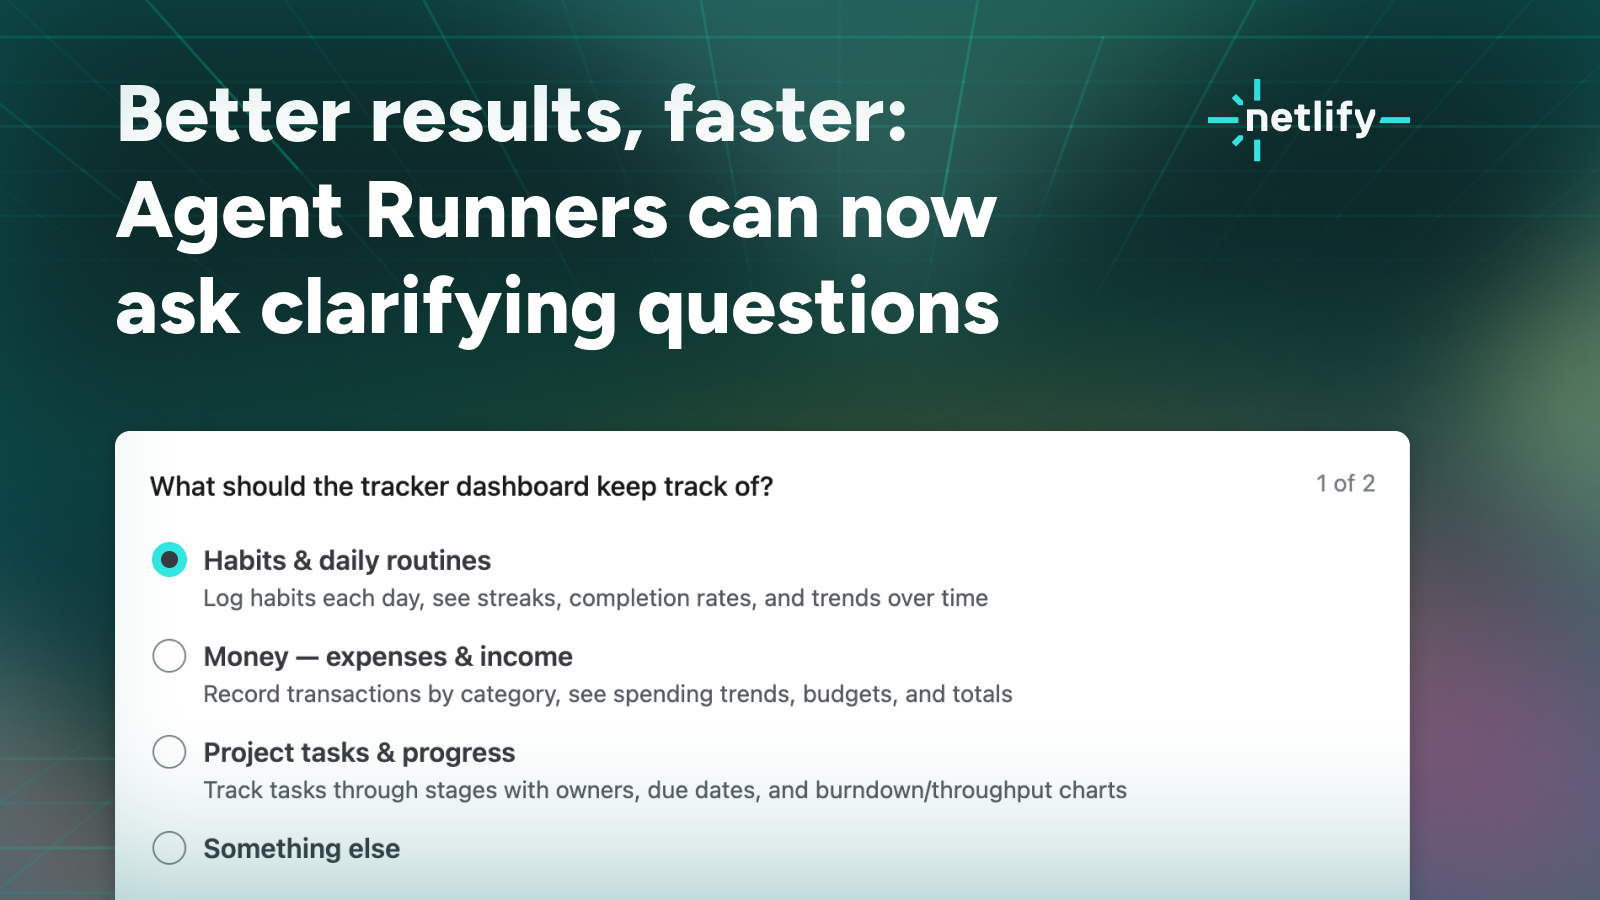
How clarifying questions work
Say you start with something broad, like “Build a tracker dashboard.” Previously the agent had to make every call for you: what the dashboard should track, whether entries should be editable and saved to a database or live in the code as a read-only placeholder, whether the look should be dark and high-contrast or light, clean, and editorial. Now it can ask, and you can answer directly where the agent run works.
Answer, skip, or add your own context
Answering questions is always optional so you can answer the ones you have opinions about and skip the rest. Or you can skip all questions and let the agent decide. Finally, you can always add context in your own words alongside your answers.
In our testing, even a few quick answers make the first build noticeably sharper and saves credits you’d otherwise spend on course corrections.
Once you answer, the run continues as usual: the agent writes the code, works with Netlify’s platform features, and creates a Deploy Preview you can review and iterate on.
Learn more
Clarifying questions work with every agent and model available in Agent Runners.
Try it out and see how to use Agent Runners in our docs.
-
Invitations to join an existing team now show up within your Netlify dashboard, where you can accept or decline them directly without checking your email inbox.
Previously, the invitation email was the only way in. If it got buried, filtered, or sent to an address you no longer check, then getting collaboration started with your teammate took a lot longer than it needed to.
Now, when you sign in to Netlify with an email address that has a pending invitation, you’ll see it waiting for you. Accept it and you’re on the team immediately. Decline it and it’s cleared out. Either way, you never have to go digging through your inbox.
Nothing changes about how invitations are sent. Invitees still receive the same email they always have, and accepting from that link works exactly as before. This is simply a second, more reliable path to the same place.
Learn more about inviting and managing teammates in Manage team members in the Netlify documentation.
-
You can now pay for Netlify with Apple Pay or Google Pay, in addition to paying by credit card.
Both options show up as you’d expect at checkout, so you can confirm a payment with the device you already have in hand instead of tracking down a card. It’s a small change, but it removes a genuine bit of friction—especially when you’re upgrading in the middle of shipping something and don’t want to break flow to go find your wallet.
Credit cards continue to work exactly as they always have. If that’s what your team uses, there’s nothing to change and nothing to migrate. Apple Pay and Google Pay are simply two more ways to pay.
Learn more in the Netlify billing documentation.